Low Carb Petit Fours
My mom is in town for a visit and I thought it would be fun for us to have a tea party with the kids. But since I’m following Trim Healthy Mama, I wanted to try and do it on plan. But low carb petit fours are not easy to find!
*Affiliate links may be included in this post. As an Amazon Associate, I earn from qualifying purchases. Please see full disclosure policy here.
These low carb petit fours have actually been on my bucket list for some time now, and I finally got around to making them. After all, I needed to do a test run to see how they turned out. I was really happy with the results.
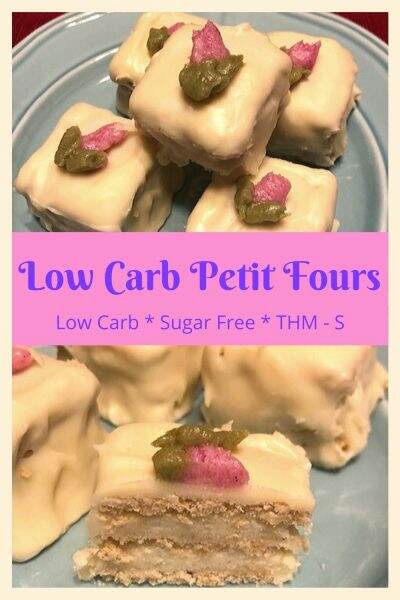
My version of petit fours contains 3 thin layers of low carb vanilla cake, vanilla icing and a coating of sugar free white chocolate. These are super-rich, but I feel like the flavors work together really well.
This recipe makes six 1.5 inch cakes. You could probably double to get 12, or possibly 13. They’re so rich and sweet you probably don’t need more than 1 per person.
Low Carb Petit Four Ingredients
Vanilla Cake Layer
1 egg
1 T butter
1/4 cup water
1 tsp vanilla extract
1/2 tsp almond extract
3 T Greek yogurt
1/2 cup Baking Blend
1/4 cup Gentle Sweet (I use my own blend)
1 tsp baking powder
Vanilla Icing Layer
1/2 cup butter, softened to room temperature
1 cup Swerve confectioners (I used 1/2 cup powdered Swerve and 1/2 cup xylitol I’d ground up with my food processor)
1 teaspoon vanilla extract
1/4 tsp salt
1/4 cup whipping cream
White Chocolate Coating
1 cup sugar free white chocolate chips
1 1/2 tsp refined coconut oil
Vanilla Cake Layer Instructions
Preheat oven to 325 degrees.
Line a quarter sheet baking pan (or half sheet if doubling) with wax paper and grease it generously with butter.
Beat together the egg, butter, water, extracts and Greek yogurt until blended, then add in the baking blend, Gentle Sweet and baking powder.
Place the dough on the greased wax paper and spread it out, as thin as you can get it. Use the heel of your hand to work it toward the edges.
It may not go all the way to the edge. That’s ok. Just try to get it roughly into the shape of a rectangle.
Bake at 325 degrees for about 20 minutes, then check it. You only want it to be be very slightly tan, on top. You want it baked through, but not too dry.
When it is done, take it out and remove the wax paper with the cake layer from the pan and set it aside to cool.
While it is cooling, make the icing.
Vanilla Icing Instructions
Note: I don’t recommend using Gentle Sweet in this recipe, as you really need the dry bulk of the Swerve or xylitol for the icing.
Mix together the butter, vanilla, salt and sweeteners until fully combined, then add the cream. Beat for about 3-4 minutes, until the icing starts to fluff up a bit. Do not over beat, or you’ll end up with super sweet butter!
Low Cab Petit Four Assembly
Trim the cake layer into a rectangle, then cut them into squares, approximately 1.5 inches.
Put icing into an icing bag or ziploc bag and cut the corner off about 1/2 inch. If using reusable bags and tips, use a tip that is about 1/4 inch in diameter.
Pipe a line along the edge of a cake square, pipe another along the opposite edge, then one more in the middle. Place another cake square on top and press down gently. Repeat with one more layer, for a total of 3 cake layers and 2 icing layers.
Repeat until you run out of cake squares, then put the cake squares into the freezer. I did overnight, but a few hours would probably be fine. You want them to be frozen solid.

White Chocolate Coating Instructions
When you are ready for dipping, melt about 2/3 cup of the chocolate chips along with a tsp of the coconut oil in a double boiler. You can also use a glass or stainless steel bowl set over a pot of boiling water if you don’t have a double boiler, but I do suggest getting one if you can. I feel it works a bit better.
I used the Bake Believe white chocolate chips, but if you are bothered by the inulin in these, you might try the ones from ChocZero. Those do contain corn fiber and I have not yet tested them for melting and dipping, but they may provide another option for you.
I really use this chocolate dipping set a lot, and the 3 pronged fork tool is perfect for this task. If you don’t have one, you could try using a regular fork.
Place one of the frozen cakes on the fork/dipping tool and hold it over the melted chocolate. Using a spoon, scoop up some of the melted chocolate and pour it over the cake.
Focus on the edges and hold the cake at an angle and let the chocolate drip down the side, allowing it to coat the whole side of the cake. Do this with each side until the top and all four sides have a coating of white chocolate.
Gently slide the coated cake of the fork/tool onto a piece of wax paper. Make sure it stays upright. You can use a knife to nudge it off the fork and onto the paper without falling on its side.
If you would like to add sugar free sprinkles or colored sweetener for decoration, it is best to add them now, before the chocolate has hardened. If you plan to decorate with icing or chocolate drizzle, you should wait until they are cooled.
Repeat with each frozen cake until they are all coated.
Decorate with colored icing or chocolate drizzle if desired. To avoid using artificial food coloring, I use dried dragon fruit powder for pink and matcha powder for green. You may choose to use regular food coloring if you like.
Serve with your favorite hot tea, scones and cucumber sandwiches!
These will be fine at room temperature for an hour or two, but if keeping longer than that, it’s best to keep them in the fridge until within an hour or two of serving. I don’t recommend freezing as the chocolate may sweat when they are set out. But they will be fine in the fridge for a few days if you want to make then in advance.
Mini Petit Four Variation
I have since made these a little smaller and got about 21 little cakes. To do this, cut the cake base into 1 inch squares and use only 2 layers of cake and one layer of icing per cake. Otherwise the method is the same. You will need more chocolate chips though, as you will be covering more surface area.
I tried it with the choc zero white chocolate chips and it worked fine. The choc zero is a little more yellowish than the Bake Believe chips, but that didn’t really bother me.
I also attempted to color the chocolate itself with natural food powders. If you look carefully you can probably see the tiny grains of powder. A liquid food coloring may give a better result, but I don’t think these were bad for using natural colors. I used dried dragon fruit powder for pink and a combo of the dragon fruit and butterfly pea powder (blue) for purple.
You can find the tools for this recipe as well as many others on my Amazon Baking store!
These petit fours are part of my THM friendly Tea Party Menu!
Do you have the nutritional value for these? I need to know how many carbs.
Wonderful recipe, it is so delicate that you can make money selling it.
Thanks for sharing this recipe!
Thanks! It is a little time consuming, but I don’t think it’s as difficult as it may look!